apu2 is a great board that require few power and well supported by OpenBSD.
However, you can't plug it to a screen but have to use the serial port to install and do admin task. Actually, it may be a good thing if you already have a laptop and don't want to buy an extra screen and keyboard.
Even though apu2 are not build anymore, we will talk here about apu2 tips, also useful for other boards with a serial port.
For the record, this documentation is hosted on an apu2d0.
Plus the usb dongle or directly the serial cable to a computer. To get to the serial console, you can run on OpenBSD :
cu -s 115200 -l /dev/cuaU0
You should run the above as root or add your username to "dialer" group before:
doas usermod -G dialer $(whoami)
Just proceed as usual with an USB key as installation media. In the console, before booting, add the following options so the installer knows we're in serial console :
boot>
stty com0 115200
set tty com0
No need to do if afterwards, the installer save this option.
You can flash the firmware with flashrom tool :
# pkg_add flashrom
Now read /usr/local/share/doc/pkg-readmes/flashrom for up-to-date instructions.
When you transfer files, you may ensure the authenticity of data.
To do so, computing a file checksum is useful. Use the sha256 command:
$ sha256 debian-9.6.0-amd64.qcow2.gz
SHA256 (debian-9.6.0-amd64.qcow2.gz) = 91831ba15446f3ab418ae8a5c2a8ac0d852dc5d43bd595a70b88bd6ea4ded397
Do the same on both ends: the output must be the same.
Notice that on GNU/Linux, sha256 don't exist. Its equivalent is sha256sum.
If you are paranoid, you can go further and check signatures with signify tool.
Use passwd command:
# passwd jdoe
To change superuser password, you have to make sure to be correctly logged with appropriate environment variables. To do so, use -l flag:
# su -l
# passwd root
Everything is ready on OpenBSD to run tasks periodically. You can edit the following scripts:
Make sure you use the full path of commands you need to run as PATH variable can be different than your user's. As example:
echo "You are so handsome" | mail -s "Hi" root # Not OK

echo "You are so handsome" | /usr/bin/mail -s "Hi" root # GOOD
Use which command_name to find absolute paths.
If you need more accurate timing, use cron.
Enter crontab -e and edit the file to specify when the user will run automatically a command. As example, to run it hourly (actually, every time the clock display "0 minutes"):
0 * * * * /path/to/command
With the example below, the command is run every 5 minutes:
*/5 * * * * /path/to/command
To learn more, read man crontab(5) manpage.
Look at this website to help you writing crontasks.
crontabs are very handy 😎.
If you need to set up another disk, we describe here how to prepare it.
⚠ Notice all this can be achieved after disk encryption and having a RAID identified as sd1 later.
Plug the disk and run dmesg. You'll see something like that:
umass0 at uhub0 port 1 configuration 1 interface 0 "Western Digital Ext HDD 1021" rev 2.00/20.21 addr 2
umass0: using SCSI over Bulk-Only
scsibus2 at umass0: 2 targets, initiator 0
sd1 at scsibus2 targ 1 lun 0: <WD, Ext HDD 1021, 2021> SCSI2 0/direct fixed serial.10581021383235373034
sd1: 1907727MB, 512 bytes/sector, 3907024896 sectors
Here, the disk is identified as sd1. Adjust according to your case later.
Actually, we create slices with disklabel:
# disklabel -E sd1
A prompt show up. Now we can create slices.
When in doubt, enter p to display the current state.
To create the first slice, enter a a. It means "Add a slice a".
Let default offset. Set the size according to your needs. To do so, you may use :
Choose filesystem "4.2BSD".
Add more slices if you want with a d, a e, a f...
⚠ Notice you can't create a c slice since it's reserved to identify the whole disk. Also, b is often used for swap, but it's not mandatory.
Once done, enter q to exit and apply changes.
Now enter disklabel sd1 to see disk state:
# /dev/rsd1c:
type: SCSI
disk: SCSI disk
label: Ext HDD 1021
duid: 782f1ddb783cdd13
flags:
bytes/sector: 512
sectors/track: 63
tracks/cylinder: 255
sectors/cylinder: 16065
cylinders: 243201
total sectors: 3907024896
boundstart: 64
boundend: 3907024065
drivedata: 0

16 partitions:
#            size       offset  fstype [fsize bsize  cpg]
  a:    629153472           64  4.2BSD   4096 32768    1
  d:   3277870464    629153536  4.2BSD   8192 65536    1
  c:   3907024896            0  unused
Notice the duid:
duid: 782f1ddb783cdd13
You can use it later to identify the disk and avoid confusions if there are several. You can find it also with this command:
# sysctl hw.disknames
hw.disknames=wd0:bfb4775bb8397569,cd0:,wd1:56845c8da732ee7b,wd2:f18e359c8fa2522b
You're almost done, you still have to create the filesystem for each slices:
# newfs /dev/rsd1a
# newfs /dev/rsd1d
Don't forget the "r" 😉
Now you can edit /etc/fstab to mount the previous slices easyly. Notice the use of the previous duid:
...
782f1ddb783cdd13.a /home/prx/music/ ffs rw,noatime,nodev,nosuid,noauto 0 0
782f1ddb783cdd13.d /mnt/backup/ ffs rw,noatime,nodev,nosuid 1 2
That's a lot of options, you'll learn more in man fstab(5).
In this example:
To mount every mountpoint listed in /etc/fstab, enter:
# mount -a
Use ifconfig command.
Your interface might have an inet (IP) and might belong to egressgroup.
As example:
$ ifconfig
lo0: flags=8049<UP,LOOPBACK,RUNNING,MULTICAST> mtu 32768
        priority: 0
        groups: lo
        inet 127.0.0.1 netmask 0xff000000
re0: flags=218843<UP,BROADCAST,RUNNING,SIMPLEX,MULTICAST,MPSAFE,AUTOCONF6> mtu 1500
        lladdr fc:aa:14:65:5f:86
        priority: 0
        groups: egress
        media: Ethernet autoselect (100baseTX full-duplex,rxpause,txpause)
        status: active
        inet 192.168.1.2 netmask 0xffffff00 broadcast 192.168.1.255
enc0: flags=0<>
        priority: 0
        groups: enc
        status: active
pflog0: flags=141<UP,RUNNING,PROMISC> mtu 33144
        priority: 0
        groups: pflog
Here, "lo0" is not the interface we're looking for: it's local interface used by some program. "enc0" and "pflog0" are not our interface, they are respectively the encrypted interface used by IKED and pf logging inteface.
It remains "re0", the ethernet as written in "media" section.
Your server keep records of its activity. It is often stored in text files called "logs". You can find most of them in /var/log and /var/www/logs.
You'll consider amongst others:
There are more.
I advice to read them from time to time to check everything works as expected. You can see them in realtime with the following command:
tail -f /var/log/messages /var/log/daemon /var/log/maillogs /var/log/authlog
Soon, you'll notice new files ending with ".0.gz", ".1.gz"... Those are archived logs. To avoid endlessly growing logs, OpenBSD run periodically "newsyslog" command and compress archives if necessary.
You can configure newsyslog if you edit /etc/newsyslog.conf. You may add new lines if an application create logs not listed:
...
/var/log/messages                       644  5     300  *     Z
/var/log/authlog        root:wheel      640  7     *    168   Z
...
As usual, read man newsyslog(8) to learn more about this file.
Lynis is a tool to scan your system looking for improvements in terms of security.
# pkg_add lynis
# lynis audit system
You'll see a lot of messages. Read /var/log/lynis-report.dat carefully then:
# less /var/log/lynis-report.dat
As example, you may read:
suggestion[]=SSH-7408|Consider hardening SSH configuration|AllowTcpForwarding (YES --> NO)|-|
suggestion[]=SSH-7408|Consider hardening SSH configuration|ClientAliveCountMax (3 --> 2)|-|
suggestion[]=SSH-7408|Consider hardening SSH configuration|Compression (YES --> NO)|-|
To filter for suggestions:
# grep suggestion /var/log/lynis-report.dat
Well, that happens...
You can buy an uninterruptible power supply (UPS). It's a kind of backup battery where you plug your server and router. in case of powerloss, the UPS keep your server running giving about 20 minutes or more to shutdown properly or find another solution.
In case a daemon crashed because of some bug, OpenBSD notice in its daily report daemons that should be running but aren't. You can check then.
So, no big deal if sometimes your server is down.
What happens when a mail server is, for some reasons, unreachable ?
SMTP protocol is designed to be reliable.
If your server is unreachable when someone tries to send you an email, things happens like in real life : the mailmain try again after some time. After trying, it may give up, sending a message to the author indicating there is a problem with the recipient.
There are no rules about time between each periodic delivery attemps. Each 4h, then each days, depending on the sender's configuration. It may give up after a week however.
To prevent the worst case where your server has burned, configure a backup mail server -- secondary -- so it keeps your emails while you are fixing your server. It is described in the mail part of this documentation.
If a daemon isn't starting, try starting it by hand to see errors ouput. As example, with httpd, you can enter:
rcctl -d start http
Check the manpage of the tool having an issue.
Look into /usr/local/share/doc/pkg-readmes if there are specific instructions.
Use pkg_check command to fix the state of your ports usage.
Look at logs with tail command to see if there are error messages :
# tail -f /var/log/messages /var/log/daemon
For a website:
# tail -f /var/www/logs/*
For login issues:
# tail -f /var/log/authlog
Also, run dmesg to see if a device has an issue.
Look at firewall traffic with tcpdump to see where it's failing:
# tcpdump -n -e -ttt -i pflog0
Try to boot on the ramdisk bsd.rd.
boot> bsd.rd [Enter]
Then choose to reinstall sets with U: Upgrade or use the shell to fix filesystem with fsck.
You also can boot on a disk prepared with "minirootXX.img".
Then choose S : Shell.
Look after your disk with dmesg. In this example, we use sd1.
Make sure it is ready with:
cd /dev && sh MAKEDEV sd1
Then, check and fix the filesystem:
fsck -y sd1a
fsck -y sd1d
Do it for each slices. Use disklabel sd1 to list them.
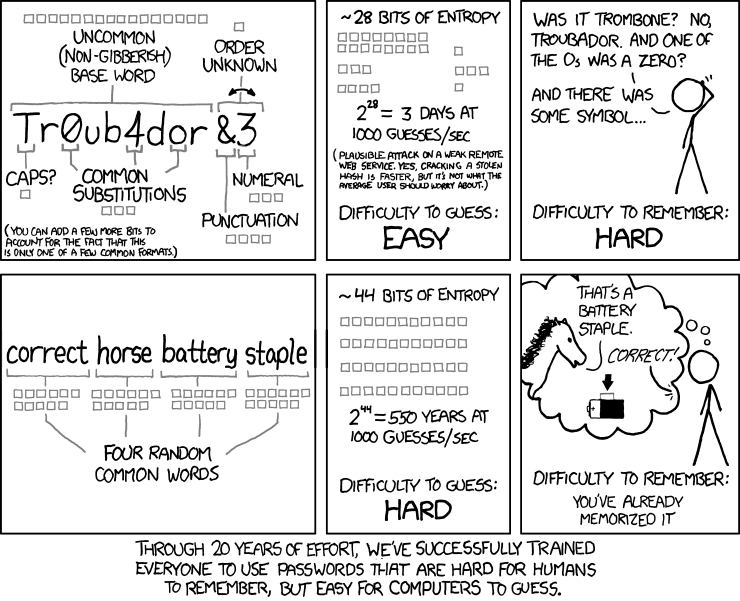
The longer the better !
The more combinations a cracking tool will have to try, the more secure is your passphrase.
You may:
You can use OpenBSD's tools to generate random passwords. Below are examples for 15 charater long passwords:
$ openssl rand 15 -base64

$ dd if=/dev/urandom count=128 bs=1M 2>&1 | md5 | cut -b-15

$ jot -rcs  20 32 126

$ tr -cd ' -~' < /dev/urandom
# only alnum
$ tr -cd '[:alnum:]' < /dev/urandom
Here are some interesting links on the topic:
If y ou have huge files to transfer, you can split them.
$ gzip -c big_file | split -b 100m - big_file.gz
You get max 100mb files sorted alphabetically :
$ ls -l
-rw-r--r--  1 xavier  xavier  104857600 Dec 12 16:52 big_file.gzaa
-rw-r--r--  1 xavier  xavier  104857600 Dec 12 16:52 big_file.gzab
-rw-r--r--  1 xavier  xavier   88204071 Dec 12 16:52 big_file.gzac
To recreate the original file, use cat:
cat big_file.gz_* | gunzip -c > big_file
Nice isnt it ? 😎
Creating users let you :
According to the user's taks, you won't create the account the same way.
To add an user, use adduser. It is interactive istead of useradd. Yeah, I know...
That's how it looks like:
root@votreserveur[~] # adduser
Use option '-silent' if you don't want to see all warnings and questions.

Reading /etc/shells
Check /etc/master.passwd
Check /etc/group

Ok, let's go.
Don't worry about mistakes. There will be a chance later to correct any input.
Enter username []: toto
Enter full name []: Jean-Eudes
Enter shell csh ksh nologin sh [nologin]: nologin
Uid [1005]:
Login group toto [toto]:
Login group is toto. Invite toto into other groups: guest no
[no]:
Login class authpf bgpd daemon default dovecot pbuild staff unwind
[default]:
Enter password []:
Enter password again []:

Name:        toto
Password:    ***************
Fullname:    Jean-Eudes
Uid:         1005
Gid:         1005 (toto)
Groups:      toto
Login Class: default
HOME:        /home/toto
Shell:       /sbin/nologin
OK? (y/n) [y]: y
Added user toto
Add another user? (y/n) [y]: n
Goodbye!
Make sure to set a good passphrase.
# userdel toto
# groupdel toto
Here you go! 😊