VPN stands for "virtual private network". As the "private" suggests, the network created is "hidden" from the great Internet.
Most of the time, VPN are used to bypass ISP restrictions, secure a public WiFi access or hide from a government monitoring.
There are various VPN tools, each offering pros and cons.
Here, we'll discuss Wireguard, OpenIKED and a bit of SSH. The two lasts are already very well documented in OpenBSD documentation. They all are available in base install.
In the following pages, we'll use as designations :
We'll configure "roadwarriors".
roadwarrior... what does that mean ?
Roadwarrior describe a setup allowing a client from any origin to reach the Internet through the VPN. Thus, the VPN servers appears to be the actual identity of the client, hiding it in the process.
A bit further, we'll describe how to set up your server so you get a fixed IP provided by the VPN. At this point, no more roadwarrior is mentioned and VPN configuration is simpler, but we'll discuss firewall configuration to redirect requests. It becomes useful if your ISP doesn't provide static IP or if your server is travelling for some reasons.
Wireguard is probably the easiest VPN to set up while one of the most secure since it requires only recent encryption methods. For clients, it is handy since it stay up even if the device's IP changes -- switching from wireless to wired as example. IPv4 and IPv6 are supported so you can get an IPV6 if your ISP doesn't offer one. Wireguard is supported natively since OpenBSD 6.8.
Wireguard official website:
Many software for various platforms are availables (android, MacOS...) so it's even more handy.
It might be the best choice if you want to self-host a VPN.
If you want to learn how Wireguard works, look at the whitepaper.
https://www.wireguard.com/papers/wireguard.pdf
Below we describe the following structure:
Understand that route's changes are for OpenBSD's clients and won't be a question with other OS clients.
In this example, IPs inside the VPN are in 10.0.0.0/24 subnet :
Here's how it will look like :
    +-------------+
    |   server    | wg0: 10.0.0.1 port 4545
    |             |---------------+
    +-------------+               |
           | Public IP            |
           | 192.0.2.2            |
           |                      |
           |                      |
    /##########\                |WireGuard
    |  Internet  |                |VPN
    \############/                |
           |                      |
           |                      |
           |rdomain 1             |
    +-------------+               |
    |   client    |---------------+
    +-------------+ wg0: 10.0.0.2
                    rdomain 0 (default)
By default, traffic goes through 10.0.0.2 unless you explicitly ask to use another route (ie: route -T1 exec ping openbsd.org)
VPN is set up by creating wgN interfaces, where "N" is a number from 0 to 9 as example. Such interface is created by filling a file /etc/hostname.wgN.
Server will listen on port 4545 UDP. Any other port can be used, just check it isn't already reserved in /etc/services.
Use the following to create a key :
openssl rand -base64 32
It returns as example: uA1ggvRv66QslZ0ygorWvcLVTxzFauffqMigXTrmLVY=
Once an interface receive a private key, you can retrieve the associated public key with ifconfig:
# ifconfig wgN
Create a key on the server:
# openssl rand -base64 32
r8uSGD6vyycE5n5/atU9/NX9JQPo4SJryNGpjbQG+rA=
Create wg0 interface with the previous private key:
# ifconfig wg0 create wgkey r8uSGD6vyycE5n5/atU9/NX9JQPo4SJryNGpjbQG+rA= wgport 4545
Now get the matching public key:
# ifconfig wg0
wg0: flags=8082<BROADCAST,NOARP,MULTICAST> mtu 1420
        index 5 priority 0 llprio 3
        wgport 4545
        wgpubkey x9VXlh4AMa2YRjTMRVE39pQRsFHRJHUYrATL6vkqFmU=
        groups: wg
The line starting with "wgpubkey" indicates the interface's public key. You'll need it for clients so they can authentify the server, so write it down.
Of course, take note of server's private key too: we'll write it later in a file to automate interface creation.
Now on a client, we do pretty much the same: create a private key and set up a wg interface without specifying a port:
# openssl rand -base64 32
    q/7uIx6wBIRUIdxOi5D6OWEQRVUt2AXhMj7j29W/s3s=
# ifconfig wg0 create wgkey q/7uIx6wBIRUIdxOi5D6OWEQRVUt2AXhMj7j29W/s3s=
# ifconfig wg0 |grep wgpubkey
    wgpubkey V3pCAhxnRl0QEL8luB9D4EvTVxGT7QGDDCZ3O26kY3A=
Once again, write down keys.
Here, we want the server to be a sort of relay between the client and the rest of the world.
You have to redirect IP forwarding on server :
# sysctl net.inet.ip.forwarding=1
Add the following line in /etc/sysctl.conf so changes are applied at reboot:
net.inet.ip.forwarding=1
For IPv6 :
net.inet6.ip6.forwarding=1
Then, add a nat rule in /etc/pf.conf:
# open 4545 UDP
pass in proto udp to port 4545
# open wg0 interface
pass on wg0
# What's from VPN (wg0) is NATted to public servers iface
pass out quick on egress from (wg0:network) to any nat-to  (egress)
Reload pf 😉
Now we've got all the material to authenticate clients and server, we can dig up the VPN. To do so, we'll indicate public keys on each devices and which IP are allowed to use the tunnel.
To make things easier, we'll edit /etc/hostname.wg0 files now. When rebooting, our configuration will remain.
Pay attention to keys, they are the same we got above. 😉
On the server:
/etc/hostname.wg0:
inet 10.0.0.1/24
wgkey r8uSGD6vyycE5n5/atU9/NX9JQPo4SJryNGpjbQG+rA=
wgport 4545
wgpeer V3pCAhxnRl0QEL8luB9D4EvTVxGT7QGDDCZ3O26kY3A= wgaip 10.0.0.2/32
up
You can add as many "wgpeer" line as you want. However, each client must have its own IP:
wgpeer V3pCAhxnRl0QEL8luB9D4EvTVxGT7QGDDCZ3O26kY3A= wgaip 10.0.0.2/32
wgpeer m7K/gfmMPYRJx1IOP01zYrNbEuMnnZ29xN4OBgRoRXo= wgaip 10.0.0.3/32
wgpeer qnuq5MgezCDHXsYYGmrcegPCNcJvz9EOIG3XyHp1DBk= wgaip 10.0.0.4/32
On client:
Here you must specify where the client can find the server ("wgendpoint") and set default routes so traffic goes through the tunnel.
wgkey q/7uIx6wBIRUIdxOi5D6OWEQRVUt2AXhMj7j29W/s3s=
wgpeer x9VXlh4AMa2YRjTMRVE39pQRsFHRJHUYrATL6vkqFmU= wgendpoint athome.tld 4545 wgaip 0.0.0.0/0
inet 10.0.0.2/24
wgrtable 1
!route add -net default 10.0.0.1
up
Dig the tunnel on client and server with :
# sh /etc/netstart wg0
Edit client's interface used to reach the internet so it uses routing table n°1. As example in /etc/hostname.em0:
autoconf
rdomain 1
up
You can now check client's IP: it's the same as the server's.
Wiregard supported OS:
https://www.wireguard.com/xplatform/
Wireguard on F-droid (android):
https://f-droid.org/en/packages/com.wireguard.android/
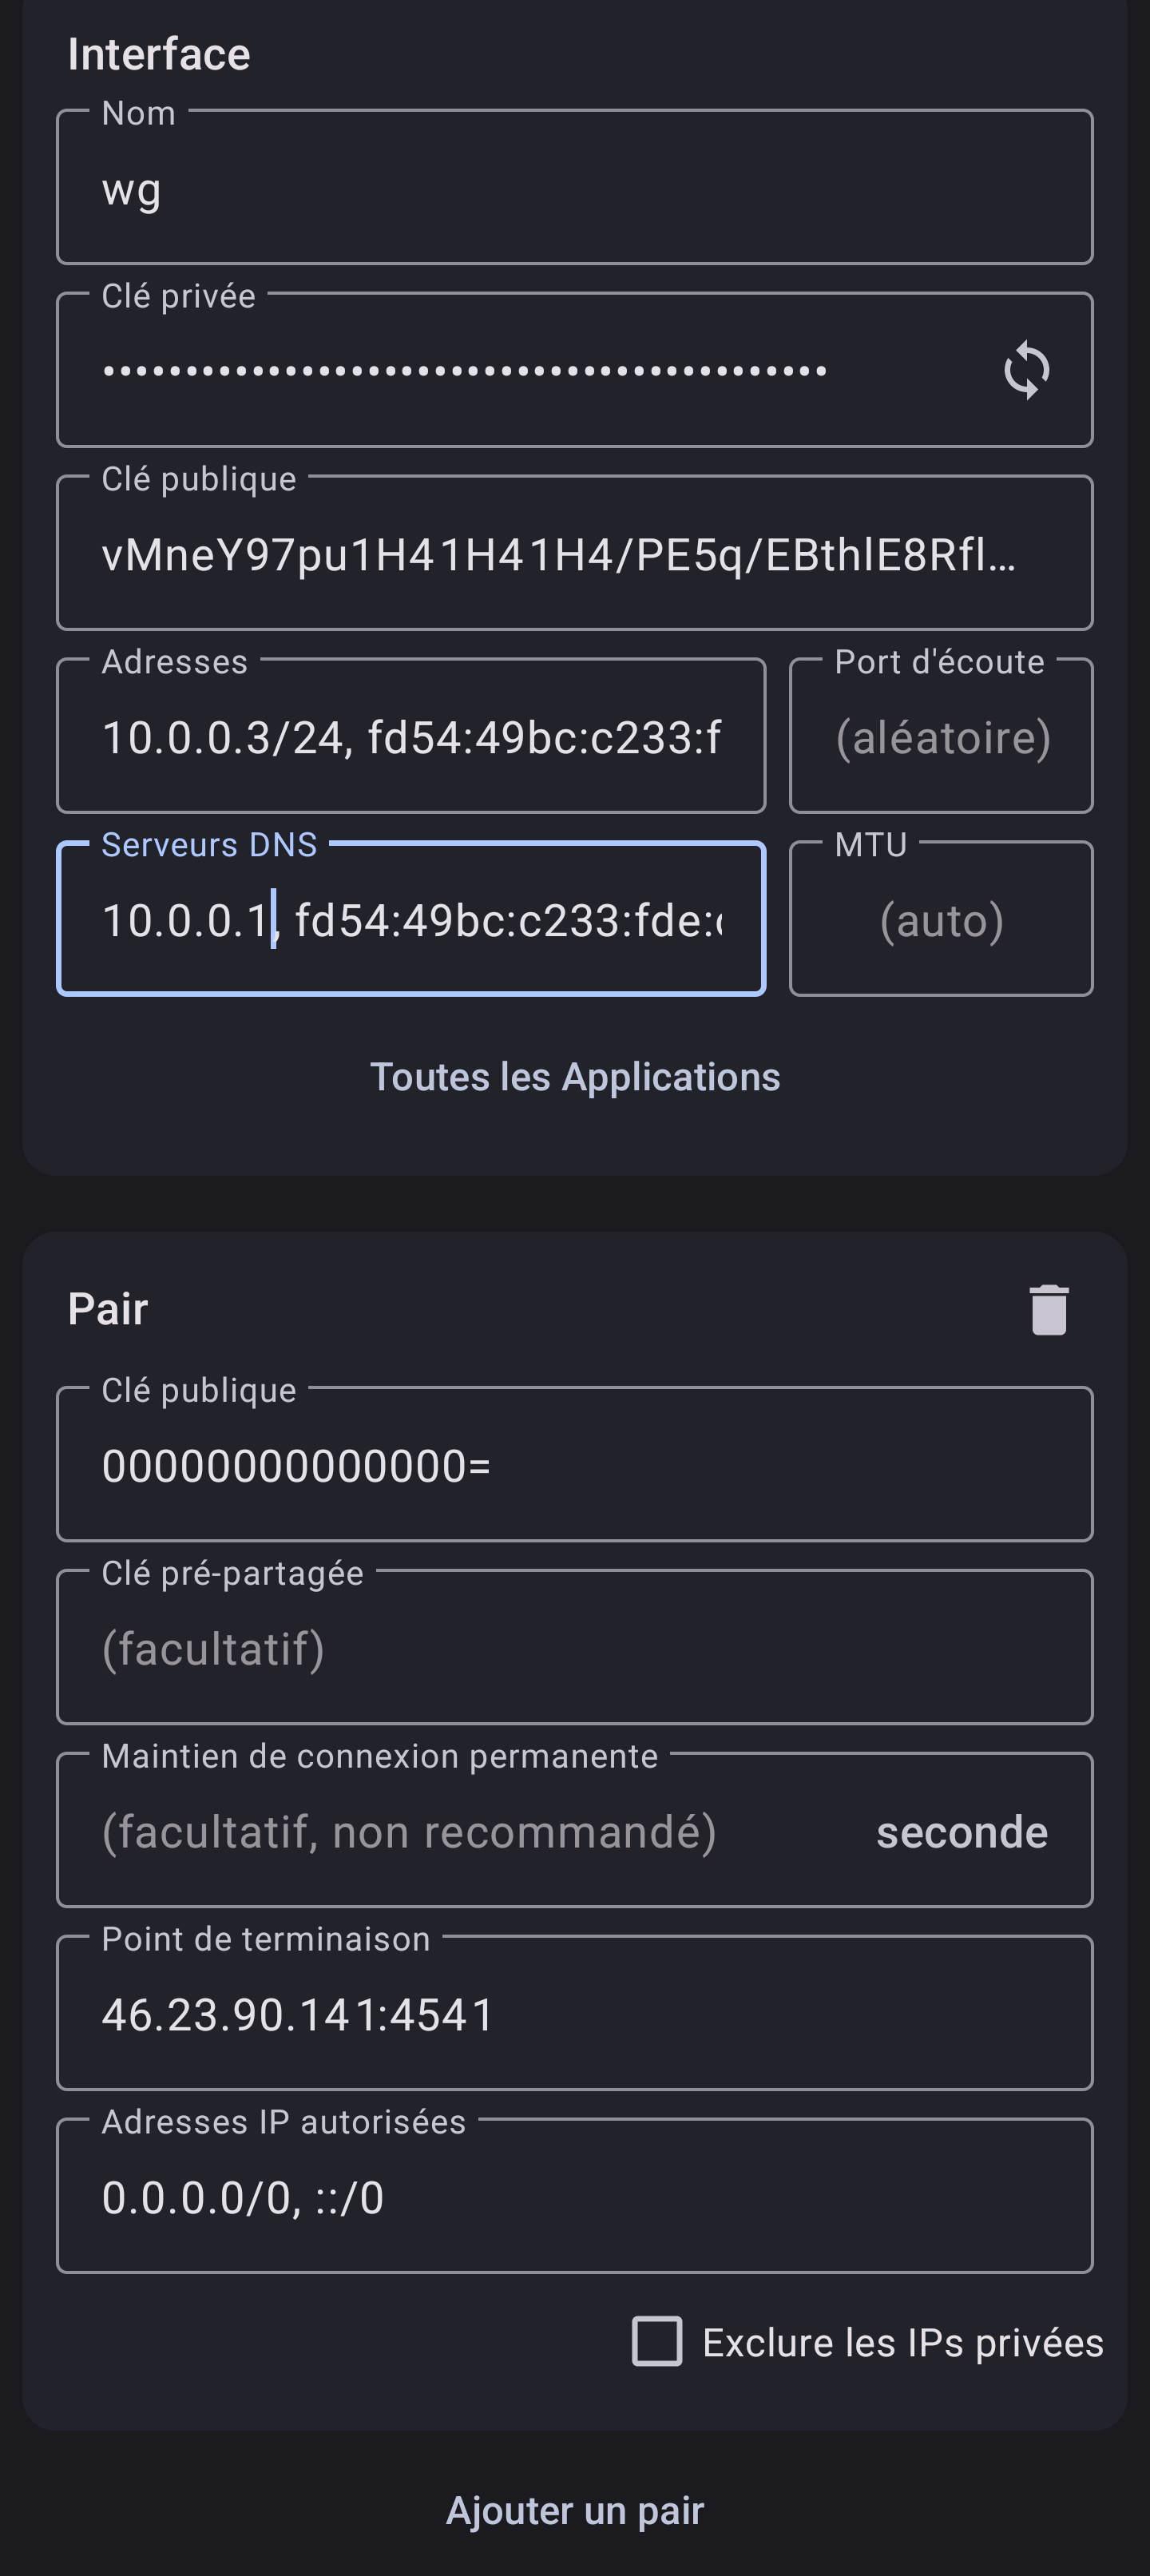
Below is the minimal requirements to set up a client:
Interface :
Peer :
Example:
This page is heavily inspired from :
https://xosc.org/wireguard.html
https://lipidity.com/openbsd/wireguard/
https://codimd.laas.fr/s/NMc3qt5PQ
Thank you very much to Solène Rapenne who had the brilliant idea to use "rdomain".
https://dataswamp.org/~solene/2021-10-09-openbsd-wireguard-exit.html
OpenIKED is a free implementation of IKEv2 protocol.
As it is already very well documented, and istead of duplicating good documentation, I suggest you to read OpenBSD's official documentation about IKEv2 in FAQ 17:
https://www.openbsd.org/faq/faq17.html
If your ISP don't offer static IP, then you could set up a VPN to use endpoint's static IP.
It also gets handy if :
Here is a scheme of what we're going to achieve :
+--~sniper~-+        +-------~tank~--------+      +--------------+
|           |        |                     |      |              |
| Your own  +<------>+   Endpoint Server   +<-----+   Visitor    |
|  Server   |  VPN   |   with static IP    |      |              |
|           |        |                     |      |              |
+-----------+        +---------------------+      +--------------+
  hidden IP               Public IP
To reach your server, one will use Endpoint Public IP.
To avoid confusion, I'll refer your server with "sniper" and the VPN endpoint with "tank".
⚠ Remember to adjust your pf.conf. Now, incoming traffic is on VPN interface, i.e. wg0 if you use Wireguard or enc0 with IKED. The easiest is maybe to replace egress by a macro with a list of all interfaces you want to handle. As example:
pass in quick on egress proto tcp to port $tcp_pass
becomes
ifaces = "{ em0 wg0 }"
# ifaces = "{ egress wg0 }" # alternative
pass in quick on $ifaces proto tcp to port $tcp_pass
Tank don't have to do nat (yet), and you don't need to change sniper's default routes. For a Wireguard tunnel, here is a short summary of what you may have configured :
On tank :
# cat /etc/hostname.wg0
inet 10.0.0.1/24
wgkey [..snip..]
wgport 4545
wgpeer [...snip...] wgaip 10.0.0.2/32
up

# cat /etc/sysctl.conf
net.inet.ip.forwarding=1
net.inet6.ip6.forwarding=1

# cat /etc/pf.conf
[...]
# wireguard tunnel
pass in proto udp to port 4545
# no nat-to
[...]
On sniper :
# cat /etc/hostname.wg0
wgkey [..snip..]
wgpeer [..snip..] wgendpoint chezmoi.tld 4545 wgaip 0.0.0.0/0
inet 10.0.0.2/24
up

# cat /etc/pf.conf
[...]
# paranoid commented below
#  pass in on wg0 from 10.0.0.1
#  pass out on wg0
# less paranoid:
pass on wg0
[...]
From now on, we suppose there is a tunnel between sniper and tank.
Now edit pf.conf on tank to add "nat-to" and "rdr-to" rules:
https://www.openbsd.org/faq/pf/nat.html
serv_int = "10.0.0.2"
serv_ext = "192.0.2.2"
int_if = "wg0"
ext_if = "egress" # change-me maybe

set skip on lo

block

# let vpn on
pass in proto udp to port 4545
pass in on wg0

### REDIRECT TO SNIPER
pass in on $ext_if proto tcp from any to $serv_ext \
        rdr-to $serv_int

match out on $ext_if from $serv_int to any \
       nat-to $serv_ext static-port
# One can replace the two previous rules with :
# match on $ext_if from $serv_int to any binat-to $serv_ext

match out on $int_if from any to $serv_int \
        received-on $ext_if nat-to $int_if

###
pass out
Make sure to edit serv_* and maybe $ext_if, the public interface.
The rdr-to rule link what's coming from anywhere (any) on the public interface $ext_if to sniper ($serv_int). Then, the nat-to does the same the other way. We use a match so the state remains until pass out. It is equivalent to a binat-to rule, but it won't let you specify ports numbers (see later). In the end, another nat-to is necessary since $ext_if and $int_if are different.
Reload pf and you're done 😊.
Some may want to fine tune their firewall and redirect only a few port:
ports_tcp = "{ ssh www https smtp submission imaps domain }"
ports_udp = "{ domain spamd-sync }"

# pass in on $ext_if from any to $serv_ext rdr-to $serv_int
# previous line is replaced by
pass in on $ext_if proto tcp from any to $serv_ext port $ports_tcp rdr-to $serv_int
pass in on $ext_if proto udp from any to $serv_ext port $ports_udp rdr-to $serv_int
[...]
If you access your server with SSH, understand the above rules will redirect you to you client automatically. You have to set up an alternative SSH port on the VPN endpoint and configure pf.conf to avoir redirecting yourself throught the VPN when you want to administer the host.
Edit /etc/ssh/sshd_config and set port to i.e. 2222 and add in /etc/pf.conf BEFORE VPN redirection. Something like:
pass in quick on egress proto tcp port 2222 # alternative ssh port
Now, in your DNS zone, your domain name should point to tank's IP.
Despite the year we live on, some ISP still don't provide IPv6 connectivity. You still can get an IPv6 thanks to a VPN if the exit point is IPv6 ready. As example, there are openbsd.amsterdam or vultr amongst others.
We will set up a wireguard tunnel as before and add IPv6 conntectivity to the client.
This website can help to generate a private IPv6 range:
https://simpledns.plus/private-IPv6
Remember to enable ip forwarding in /etc/sysctl.conf
net.inet.ip.forwarding=1
net.inet6.ip6.forwarding=1
In file /etc/hostname.wg0 to configure wireguard interface, you must specify IPv6 of VPN exit point. Here, it's fd9c:f774:0bfa:acfc::1/64.
Each client should be able to get its own IPv6. We add a new option wgaip after the previous one. The configuration will look like this:
# cat /etc/hostname.wg0
inet 10.0.0.1/24
inet6 fd9c:f774:0bfa:acfc::1/64
wgkey [...snip...]
wgport 4545
# peer 1
wgpeer [...snip...] wgaip 10.0.0.2/32 wgaip fd9c:f774:0bfa:acfc::2/128
# peer 2
wgpeer [...snip...] wgaip 10.0.0.3/32 wgaip fd9c:f774:0bfa:acfc::3/128
# peer 3
wgpeer [...snip...] wgaip 10.0.0.4/32 wgaip fd9c:f774:0bfa:acfc::4/128

up
⚠ Each client's IPv6 MUST end with /128.
In /etc/hostname.wg0, you have to add a few things:
Now, Wireguard interface on the client look like this:
# cat /etc/hostname.wg0
wgkey [...snip...]
wgpeer [...snip...] \
    wgendpoint <XX.XX.XX.XX> 4545 \
    wgaip 0.0.0.0/0 \ # <--- !
    wgaip ::0/0 \
    wgpka 25

inet 10.0.0.3/24
inet6 fd9c:f774:0bfa:acfc::3/64 # <--- !
wgrtable 1
up
!route add -inet default 10.0.0.1
!route add -inet6 default fd9c:f774:0bfa:acfc::1 # <--- !
Here you go, now you have an IPv6 on the Internet.
You can see it with the following command:
curl -6 https://ifconfig.co
SSH let you create a PROXY to encapsulate some traffic and even creating a rudimentary VPN.
To appear with the remote server's IP, dig an SSH tunnel :
From your computer :
ssh -D 9999 -NT batman@athome.tld
Then, configure applications to use a SOCKS proxy on localhost port 9999.
With Firefox, it is configured in "Network parameters".
You can use a public resolver, but for obvious privacy reasons, it sucks..
You may set up unbound on your VPN provider so it answers to DNS requestion from VPN's clients.
Then, just set "10.0.0.1" in /etc/resolv.conf to use your resolver.
# cat << EOF > /var/unbound/etc/unbound.conf
server:
	# listen on VPN's IP
        interface: 10.0.0.1

        access-control: 0.0.0.0/0 refuse
        access-control: 127.0.0.0/8 allow
        access-control: ::0/0 refuse
        access-control: ::1 allow

	# accept requests from the VPN's clients
        access-control: 10.0.0.0/24 allow
        private-address: 10.0.0.0/24


        hide-identity: yes
        hide-version: yes

        auto-trust-anchor-file: "/var/unbound/db/root.key"
        val-log-level: 2

        aggressive-nsec: yes
EOF
# rcctl enable unbound
# rcctl start unbound
Now take a look at unbound-adblock to filter bad domains:
https://www.geoghegan.ca/unbound-adblock.html
See also:
https://marcocetica.com/posts/wireguard_openbsd/
See man ssh(1) at "SSH-BASED VIRTUAL PRIVATE NETWORKS":
http://man.openbsd.org/ssh#SSH-BASED_VIRTUAL_PRIVATE_NETWORKS