DNS (Domain Name System), are road signs of the Internet. That's how a human can recognize server's names, like a big directory but for Internet.
It is also used to know where a mail should be delivered, and many others things hidden to normal human beings but crucial to have a reliable network.
DNS is based on the idea of a "zone". First, you start at the root represented by a dot ".". The root list addresses of all authoritary name servers: tld (.fr, .de, .com, .net, .org...). Each tld has a list of servers for the next levels.
That's how it looks like:
                     .
                     |
                     |
 +-------+-------+---+--+-------+-------+
 |       |       |      |       |       |
 v       v       v      v       v       v
.fr    .com    .tld   .xyz    .org    .net
                 |
   +-------------+--------------+
   |             |              |
   v             v              v
site.tld     athome.tld     other.tld
                 |
                 +------------------+
                 |                  |
                 v                  v
         webmail.athome.tld   wiki.athome.tld
If you start at the root, you can find the IP of any domain name. Searching through the zone is called "resolving". A server hosting data about a zone is "authoritary".
When a resolver retrieve a device IP, for a website or other purpose, it is kept in cache, in memory, as long as it is specified in the Time To Live (TTL) of the zone. So it is not reached too often.
This validity expiration time means there will be a delay before every resolver update a fresh zone. However, a bigger TTL means less network stress. It's about balance.
A few years ago, clever people started worrying since DNS is critical. It had to be secured.
It is actually quite easy to be redirected on fake addresses. We need a way to ensure DNS authenticity.
To do so, domain name owner wite a zone and sign it. Resolvers check if the signature is correct.
Thus, you are certain to have reached the correct IP behind a domain name, not hijacked on a fake website.
One can publish safe data through DNS. That's the idea of DANE/TLSA to to publish fingerprints of TLS certificates.
https://en.wikipedia.org/wiki/DNS-based_Authentication_of_Named_Entities
Zone files uses a standard format understood by every domain name servers.
Below is an example of /var/nsd/zones/athome.tld:
$TTL 1D

@           IN SOA    master.athome.tld. hostmaster.athome.tld. (
          ; domain of DNS server
          ; followed by admin email address
          ; Here : hostmaster@athome.tld
          ; "@" is replaced by a "."
                    2014110502      ; serial number to increment
                                    ; after each changes
                    86400           ; Refresh
                    7200            ; Retry
                    3600000         ; Expire
                    172800 )        ; Negative Cache TTL

$ORIGIN athome.tld.
@           IN NS       master
@           IN NS       secondary

@           IN MX       10 mail1
@           IN MX       20 mail2

master      IN A        192.0.2.2
master      IN AAAA     2001:db8:1:1::2

mail1       IN A        192.0.2.10
mail2       IN A        192.0.2.11

ipv4only    IN A        192.0.2.15
ipv6only    IN AAAA     2001:db8:1:1::400
dualstack   IN A        192.0.2.200
dualstack   IN AAAA     2001:db8:1:1::200

gate        IN AAAA    %%ipv6_gate

master      IN A       %%ip_pub_master
master      IN AAAA    %%ipv6_master

secondary  IN  A       %%ip_pub_second
secondary  IN  AAAA    %%ipv6_second
...
DNS records are usually written like this :
NAME TTL CLASS TYPE DATA(RDATA)
NAME is what you're looking for when you ask a resolver.
TTL is Time To Live, delay while the data is considered as valid.
Class means internet (IN). At the beginning, other classe were used but not anymore.
Type is the kind of data in the record.
At last, RDATA is the data relative to the Name.
"$ORIGIN" is the complete zone name. As example, "athome.tld".
When a zone file don't have a "$ORIGIN" instruction, the domain name server will create one with the zone name.
"@" is replaced by "$ORIGIN".
Read the following page if you want to learn more about "$ORIGIN":
http://www.zytrax.com/books/dns/apa/origin.html
"$TTL" is the validity duration of datas. It is recommended to set to 1 day (1D).
Each DNS record can have its own TTL if you want to reduce network stress for very stable fiels such as MX and NS.
"$ORIGIN" and "$TTL" must be written at the beginning of the zone file.
The first record with "$ORIGIN" and "$TTL" is called SOA as in Source Of Authority. It is crucial. The first field after SOA indicate the origin name server, in example "master.athome.tld". and the last field indicates the domain administrator mail address. "hostmaster.athome.tld." will turn into "hostmaster@athome.tld". The first dot is turned into a "@". You may have set an alias on hostmaster when you configured the mail server. If you can't and have to use a dot before the "@" in the admin mail (you like it rough... 😲), you have to write a "\" before :
john\.doe.athome.tld.
Autoritary domain name server and administrator mail can be on different servers or domains.
The serial number can have multiple formats, but always must increase everytime the zone is updated. Thus, secondary servers notice there is an update to download. Some admins use a timestamp, others start from 1 and increment each time. It's up to you.
SOA values (refresh, retry, expire, negative) and TTL in the example are those recommended in standard (RFC). Of course you can use your own values, but in doubt you have a robust example.
By default, values are seconds. You can write them as hours (H), days (D) or weeks (W).
"Refresh" and "Retry" describe when secondary autoritative servers should reload the zone. Nowadays, most servers send alerts to secondary servers so it's automatic.
"Expire" tells how many time we can still use data in the zone if servers are unreachable. It is not TTL.
"Negative" is the delay a NXDOMAIN answer (non existent data requested) is kept in cache.
It may be one of the most important record type. Like others, they follow this format : {NAME, TTL, CLASS, TYPE, RDATA}.
Addresses of device master.athome.tld are recorded like this :
master          IN A        192.0.2.2
master          IN AAAA     2001:db8:1:1::2
Remember the last dot in addresses is very important. It represent the root zone. If a data doesn't end with a dot, it is expanded or will be buggy.
As example :
@ 1W IN NS machine
Is a record to machine.athome.tld. However,
@ 1W IN NS machine.other.tld.
Is not completed and remains machine.other.tld.
CNAME, means Canonical NAME, it is an alias.
In the following example, the real name of www is master.athome.tld.
www IN CNAME master
It is used for virtual hosts such as blog.athome.tld, webmail.athome.tld, ...
A DNS zone should have at least 2 NS records since they describe where are the authoritative servers. Actually, the zone will work with only one as long as the domain name server doesn't encounter any problem.
There is no NS servers maximum limit in theory. If you got two, that's a good start : yours and a friend's server.
athome.tld. IN NS master.athome.tld.
This record means : for zone athome.tld, authoritative name server (NS) is master.athome.tld. It also can be written this way :
@ IN NS master
In this case, the "@" is replaced by "$ORIGIN", actually its full name to the root, and master hasn't an ending dot so it is expanded with $ORIGIN too: master.athome.tld.
Name servers must be known to the rest of the world, you have to register them in the registrar, in the tld zone. This is actually one of the two only records you have to do in your registrar panel with DNSSEC keys records. Later, once authoritative server are published, everythings will happen on your server.
When recording NS on the registrar, you generally give two fields: the full hostname of the server, master.athome.tld here, and its addresses. In this case, we talk about "Glue Record". How to know master.athome.tld even though it's it who knows addresses for zone athome.tld? In this specific case, the address is written in the registrar.
To record authoritative servers on the registrar, you have to log on your registrar panel.
You'll find a panel "GLUE" in your domain setup.
Once the new GLUE recorded, you can modify the name server list for your domain.
Read more about registrars and self-hosting with this article:
https://www.22decembre.eu/en/2016/09/11/registrars/
MX, a little like NS, tells where is a kind of service for the zone. In this case, where mail should be delivered. The record is build the same way as before :
@     IN MX 10   mail1
@     IN MX 20   mail2
For the zone athome.tld, the mails server (MX) are mail1.athome.tld and mail2.athome.tld.
The only significant differences is the "10", indicating the priority or "weight". When you have multiple servers, which one has priority to receive the mail? The one with the lowest weight.
If you self-host, you can choose to use the main domain name instead of a subdomain with the same address in the A record, it is still valid:
@ IN MX 10 athome.tld.
MX and NS can't be redirections (CNAME), they must point to A or AAAA records, or in last resort to IP.
TXT records are used to publish various data about your server. It is useful to share public keys as example. It looks like this :
@ IN TXT "v=spf1 a mx ~all"
That's it for this long part about DNS. Do not hesitate to read again later, there are many things to understand here.
Of course, you can do so much more with DNS (SRV, SSHFP, ...), we'll describe each case later if necessary.
Unwind is available dy default on OpenBSD. It resolve domains (DNS) on your own device instead of asking your ISP or external provider. Results are kept in cache. This increase your server's performances and I strongly suggest to enable it 😎.
Notice unwind only work locally and can't do resolution for other devices. To provide such feature, look at unbound.
To use unwind, enable is as usual :
# rcctl enable unwind
# rcctl start unwind
Edit /etc/resolv.conf file so your server asks unwind to resolve domain names. This is not necessary if you use DHCP.
nameserver 127.0.0.1
Here you go, your server now resolve domain names on its own.
You can try how well unwind works using dig command to see DNS requests results:
$ dig si3t.ch
[...]
;; Query time: 61 msec
61 ms were necessary to get an answer. Now try again :
$ dig si3t.ch
[...]
;; Query time: 0 msec
Yay, the address in in cache, speeding up future requests until TTL.
If you want to go further, read unwind, unwind.conf and unbound manpages:
https://man.openbsd.org/unwind
https://man.openbsd.org/unwind.conf
https://man.openbsd.org/unbound
You absolutely can host the authoritative server for your own zone, one step further to independence 😏. That is exactly the purpose of nsd available in OpenBSD base.
To configure nsd, edit /var/nsd/etc/nsd.conf.
server:
        hide-version: yes
        zonesdir: "/var/nsd/zones"
        ip-address: 192.168.1.2
        ip-address: 2001:db8:1:1::2
        debug-mode: no
        verbosity: 1

# master zones
zone:
        name: "athome.tld"
        zonefile: "master/athome.tld"
We will follow this structure: zones are categorized wether the server is authoritative (master) or secondary (slave). Each zone is a file named as the corresponding domain. As example /var/nsd/zones/master/athome.tld. Or course you can choose to do things differently if you prefer.
Do not forget to adjust the above example with your own IP.
Once setup, start nsd as usual :
rcctl enable nsd
rcctl start nsd
Remember to open (and redirect) port 53 (domain) UDP and TCP since it's used by nsd.
Once your nsd is up, you can set in the registrar your server's public ip in the list of authoritative servers for your zone.
An nsd example is available at the end of this documentation.
DNSSEC requires two kind of keys : ZSK (Zone Signing Key) light and short time living, and KSK (Key Signing Key) bigger with a long time usage.
Why such differences ?
It is recommended to renew KSK regularly -- about monthly, some do it weekly. However, it is quite annoying to update this monthly in the registrar.
That's why we created another kind of key to sign the firsts, but used only for this task. Those should be stronger, heavier since they are less used with a longer lifetime. Those will be recorded in the registrar.
Actually, we won't record KSK in the registrar but a checksum instead in the upper zone. It's the same idea with each zone publishing their NS in the upper zone.
Keep in mind changes won't propagate instantly. There is TTL, lifetime and validity of keys and signatures, so you can't expect to see things working right away.
Especially, you must publish in advance keys that will be used in the near future. That's why many administrators have 2 ZSK in the meantime: one currently used and another that will be used when the first has expired. That's what we'll do below. KSK are also published early, however rarely two in the same time.
Signing your DNS zone ensure its integrity.
You have to do it periodically since signature have an expiration date. You'll need a tool to sign and a bit of automation.
We will describe how to use ldnscripts designed for this task (thanks to 22decembre).
https://www.22decembre.eu/en/2017/11/01/ldnscripts/
Note there are tools more complete/complicated such as OpenDNSSEC or KNOT.
With ldnscripts, you'll only need the package ldns-utils :
# pkg_add ldns-utils
Automation relay on tools already available on OpenBSD, I mean scripts /etc/weekly, /etc/monthly...
Let's follow ldnscripts' author's intructions :
$ cd /tmp
$ ftp https://framagit.org/22decembre/ldnscripts/-/archive/master/ldnscripts-master.tar.gz
$ tar xvzf ldnscripts-master.tar.gz
$ cd ldnscripts-master*
# make install
Configure ldnscripts in /etc/ns/ldnscripts.conf. There is an example in the previous archive. Configuration should look like this:
# repository where to find unsigned zone file and specific conf
NS_REP=/etc/ns

# serial : unixtime
SERIAL=unixtime

# algorithm to use. They are listed : ldns-keygen -a list
ALG=ECDSAP384SHA384

# length of the zsk
ZSK_BITS=1024

KSK_BITS=2048

# validity of signatures in days
VALIDITY=9

#NSEC3
NSEC3_ALG=SHA-384
RUN=24

# Verbose - set to 1 if needed
VERBOSE=1
If you want, you can set a configuration file per domain. They should be named /etc/ns/domain-name.tld.conf.
That's it for configuration 😊
To actually start using ldnscript, run with init parameter to create everything required: first keys, directories...
# ldnscript init athome.tld
You can read such output (below, VERBOSE is enabled):
This script will initialize your zone athome.tld with the general configuration or the
one set at /etc/ns/athome.tld.conf.
If you are not happy with it, modify your configuration (by copying the conf file to /etc/ns/athome.tld.conf and then editing it) and run this script again.
The script will create one KSK and two ZSK and finally sign the zone (which will triger a reload of your nsd server on the athome.tld zone).
The key Kathome.tld.+010+25115 has been generated with these arguments : -a RSASHA512 -b 1024 athome.tld
The key Kathome.tld.+010+34655 has been generated with these arguments : -a RSASHA512 -b 1024 athome.tld
The key Kathome.tld.+010+12321 has been generated with these arguments : -k -a RSASHA512 -b 2048 athome.tld
A new KSK key has been generated.
Make sure to update the DS record in your registrar quickly.
The key is Kathome.tld.+010+12321
DS content :
athome.tld. IN      DS      12321 10 2 f6f91afd522680a3c459e1956e75f8eda078f99b8cf07114f0d299161bff0145
create a complete zone file for athome.tld with the current time as SOA
Signing zone
Zone is verified and complete
A directory /var/ldnscripts/athome.tld/ is created, containing ZSK and KSK.
Signed zone file is in /var/nsd/zones/signed/athome.tld. Adjust nsd configuration to serve it:
server:
    zonesdir: "/var/nsd/zones"
    ...

# master zones
zone:
    name: "athome.tld"
    zonefile: "signed/athome.tld"
Notice nsd is a static server, that's why ldnscript will reload it's configuration.
Warning, you must publish in your registrar public keys you can find in /var/ldnscript/athome.tld/ksk with .key extension. Depending on your registrar, you may have to publish DS records in .ds files).
It's not over yet, we will set up a signing process with key renewal when necessary. Everything is ready, don't worry 😊.
ldnscript offers those actions :
Actually, you'll edit /etc/monthly.local to add the rollover :
/usr/local/sbin/ldnscript rollover all
Then, make sure signatures are renewed before the end of VALIDITY parameter in configuration file. Above, we set 9 days so you can sign each week 2 day early. Edit /etc/weekly.local:
/usr/local/sbin/ldnscript sign all
Finally, every year, you will create a new KSK :
/usr/local/sbin/ldnscript ksk athome.tld
To remember, you can add a new crontab to send you a message every May the 2nd (someone's birthday 😜):
# crontab -e
0 0 2 5 * echo 'renew ksk' | mail -s "KSK ALERT" root
Remember to publish this new key in the registrar. The script rollover will delete the old key automatically. At this point, you may remove its record in the registrar.
That's it! Everything else is handled by ldnscript, it requires some efforts only the first time.
Notice in the example, you deal with multiples zones automatically.
When you renew KSKs, you must add in your registrar the public key. Make sure to do it early enough si it is correctly propagated before the old one is dismissed.
Ldnscript will display the number of the new key (keytag) and its checksum (DS) useful to record it in the registrar.
The public key is located at /var/ldnscripts/zones/athome.tld/ksk/Kathome.tld*.key.
Once a key is dismissed, you can delete the previous DS record.
Sometimes called "slave", a secondary server (NS) can serve your zone in case the primary (master) is unreachable for reasons: network unreachable, nsd daemon crashed, meteor shower, frog invasion or worse pancakes shortage.
You could ask a friend with a domain name server (not necessarily OpenBSD nor nsd either, even if it's what we describe here) to host your zone as a slave on your domain. You can even install a secondary server on your own -- on a VM rented at openbsd.amsterdam as example 😊. It's important that the secondary server is in another network, and even the same area : a few hundreds of kilometers are a good plan to mitigate power outage or network issues 😉.
Note you can absolutely set up secondary servers for your friend's domain, being mutually the slave of the other's domain name server.
We will describe both side of the picture. You could be administrator of master server, secondary server or both at the same time.
First, we prepare a little bit of authentication.
Yes, I know, it's hard work. But we want to do things right 😉? Here, we ensure our zone is updated by a legitimate server.
We will create a shared secret key, identical on both primary and secondary.
We use ldns-keygen command available in ldns-utils package you already have installed if you followed the previous part. It will create a keypair with a "secret" code inside:
$ cd /tmp
$ ldns-keygen -a hmac-sha256 -b 160 athome.tld
You have two new files, display the content of the private key:
$ cat Kathome.tld.+159+54791.private
Private-key-format: v1.2
Algorithm: 159 (HMAC_SHA256)
Key: H8D/Ka9RerEtmC0jN5hSQeATxNI=
Copy "Key" string in nsd configuration for master and slave servers in a "secret:" parameter. Remember to adjust with the proper algorithm:
key:
        name: "transfer"
        algorithm: hmac-sha256
        secret: "H8D/Ka9RerEtmC0jN5hSQeATxNI="
The "name:" parameter -- transfer here -- doesn't matter. It's just a mark.
You can delete previously created files in /tmp now.
In the configuration of the domain name server, you add two lines to alert the slave server so it retrieve the zone. For this purpose, you add instructions notif and provide-xfr:
# master zone
zone:
       name: "athome.tld"
       zonefile: "signed/athome.tld"
       notify: 192.0.2.1 transfer
       provide-xfr: 192.0.2.1 transfer

key:
        name: "transfer"
        algorithm: hmac-sha256
        secret: "H8D/Ka9RerEtmC0jN5hSQeATxNI="
Everytime you update the zone on your primary domain name server, it will alert the server on the address 192.0.2.1 so the latter update the zone.
Many online services -- such as registrars -- offer to host your zone as slaves for free. In this case, it is not necessary to notify: servers get the zone on schedule. Keep the provide without authentication: NOKEY in place of the key name.
To see how to use secondary server of GANDI, follow this link.
https://docs.gandi.net/en/domain_names/advanced_users/secondary_nameserver.html
Now add in your zone and in the registrar the secondary servers for your zone (NS):
$ORIGIN athome.tld.
$TTL 86400

@           IN SOA    master.athome.tld. hostmaster.athome.tld. (
                        2014110502      ;
                        86400           ; refresh
                        7200            ; retry
                        3600000         ; expire
                        172800 )        ; negative

@               IN NS       master.athome.tld.
@               IN NS       secondairy.athome.tld.
@               IN NS       other.domain.tld.    ; a friend is
                                                 ; helping

maitre          IN A        192.0.2.2
maitre          IN AAAA     2001:db8:1:1::2

secondaire      IN A        192.0.2.3
Just add a bit of configuration for nsd:
# slave zone
zone:
       name: "athome.tld"
       zonefile: "slave/athome.tld"
       allow-notify: 192.0.2.2 transfer
       request-xfr: 192.0.2.2 transfer

key:
        name: "transfer"
        algorithm: hmac-sha256
        secret: "H8D/Ka9RerEtmC0jN5hSQeATxNI="
Notice both transfer keys share exactly the same configuration on each server.
Zones files should stay untouched on the secondary server. They will be updated automatically when needed. Edit the nsd configuration if you need to change their location: zones will be fetched again.
You can check if zones are in sync with dig:
$ dig -q @master.athome.tld athome.tld
$ 192.0.2.10
…
$ dig -q @secondairy.athome.tld athome.tld
$ 192.0.2.10
Make sure you added secondary servers in the name servers lists in your registrar.
You may use the following links to check if your zone is correctly propagating over the world or has no errors:
DNSSEC:
https://dnssec-debugger.verisignlabs.com
nic.eu.org offer domain names ending with "eu.org".
We'll see how to set up a zone with this registrar.
First, check availables domains open for registration then choose one you like.
https://nic.eu.org/opendomains.html
For the example, we'll use "athome.tld.ca.eu.org"
Create the domain zone. Since we'll use "ldnscripts" later to enable DNSSEC, we write it in /etc/ns/athome.tld.ca.eu.org:
$TTL 1D
$ORIGIN athome.tld.ca.eu.org.
@       IN SOA ns1.athome.tld.ca.eu.org. batman.athome.tld. (
                              2017111301
                              1D
                              2H
                              2W
                              2D )
@                             IN NS     ns1.athome.tld.ca.eu.org.
@                             IN A      192.0.2.2
@                             IN AAAA   2001:db8:1:1::2
ns1                           IN A      192.0.2.2
ns1                           IN AAAA   2001:db8:1:1::2
ns2                           IN A      192.0.2.3
This is a pretty simple zone with two name servers, "ns1" and "ns2", the latter only available on IPV4.
We add a new section in nsd for "nsd1":
# cat /var/nsd/etc/nsd.conf

key:
    name: "transfert"
    algorithm: hmac-sha256
    secret: "Hsd/Ka9RerEtmC0jsd5d5eATxNI="

zone:
    name: "athome.tld.ca.eu.org"
    zonefile: "signed/athome.tld.ca.eu.org"
    provide-xca: 192.0.2.3 transfert
    notify: 192.0.2.3 transfert
Do the same on secondary server "ns2":
# cat /var/nsd/etc/nsd.conf

key:
  name: "transfert"
  algorithm: hmac-sha256
  secret: "Hsd/Ka9RerEtmC0jsd5d5eATxNI="

zone:
  name: "athome.tld.ca.eu.org"
  zonefile: "slave/athome.tld.ca.eu.org"
  allow-notify: 192.0.2.3 transfert
  request-xca: 192.0.2.3 transfert
reload nsd :
# rcctl reload nsd
Enable the zone with ldnscripts and prepare for DNSSEC:
# ldnscript init athome.tld.ca.eu.org
That's ready. Now it is served, you can register the domain.
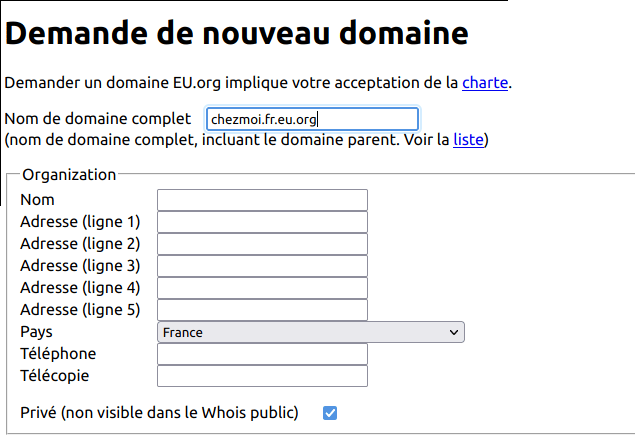
Create an annount on nic.eu.org and connect.
Choose to create a New Domain.
Fill the fields with the full domain name you want to register and data about yourself.
(french screenshot, sorry about that)
Then, fill "Name server" section. You must link the domain name and NS servers for the zone. The zone should already be managed by the servers. You can use IPV4 and IPV6 both. In other words, fill with the "NS" records in your zone.
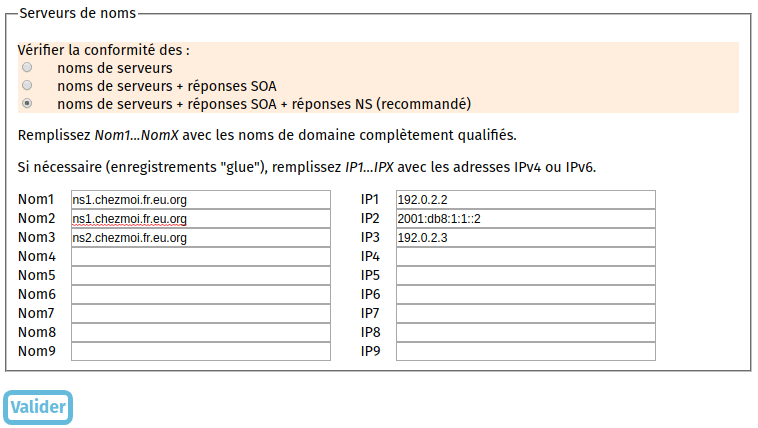
At last, after validating, you may read something like that if everything works as expected:
  ---- Servers and domain names check

  Accepted IP for NS1.ATHOME.TLD.CA.EU.ORG: 2001:db8:1:1::2 192.0.2.2
  Accepted IP for NS2.ATHOME.TLD.CA.EU.ORG: 192.0.2.3

  ---- Checking SOA records for athome.tld.ca.eu.org

  SOA caom NS1.ATHOME.TLD.CA.EU.ORG at 2001:db8:1:1::2: serial
  2019100702 (21.005 ms)
  SOA caom NS1.ATHOME.TLD.CA.EU.ORG at 192.0.2.2: serial 2019100702 (6.006 ms)
  SOA caom NS2.ATHOME.TLD.CA.EU.ORG at 192.0.2.3: serial
  2019100702 (73.715 ms)

  ---- Checking NS records for athome.tld.ca.eu.org

  NS caom NS1.ATHOME.TLD.CA.EU.ORG at 2001:db8:1:1::2: ok (20.674 ms)
  NS caom NS1.ATHOME.TLD.CA.EU.ORG at 192.0.2.2: ok (5.953 ms)
  NS caom NS2.ATHOME.TLD.CA.EU.ORG at 192.0.2.3: ok (65.559 ms)


  No error, storing for validation...
  Saved as request 20191007195509-arf-42318

  Done
Check your emails. You soon will get a configmation message about your registration.
Once it's done, you can enable DNSSEC in the dedicated panel
Copy the DS record in nic.eu.org field:
cat /var/ldnscript/athome.tld.ca.eu.org/ds
Now you can check dnssec is correctly enabled.
https://dnssec-analyzer.verisignlabs.com/